How to build a CRUD API with NodeJs and MongoDB(Final Part)

I am a Backend Developer with skills in Nodejs, relational database management systems as well as NoSQL.
I hope to transition or better still, add DevOps to my skill set very soon.
This is a three-part series on building a CRUD API with NodesJs and MongoDB. In the previous two parts, we started and completely built out our CRUD API and communicated with the MongoDB database. If you haven't been following, you can catch up by going to part one and part two. You can access the project repo here
In this final part, we will be writing tests to test our endpoints and ensure they work as expected. We'll configure GitHub Actions, add a MongoDB database and run our tests in the Actions workflow, add the GitHub repository of this project to coveralls and obtain a badge for test coverage. Finally, we'll deploy the project to Heroku.
Testing our endpoints
In part one of this series, we created a tests sub-directory in the src folder. This is where we'll write our tests. We also installed some devDependencies in part one. These will come in handy in writing these tests.
To write tests for our API, we’ll make use of the Mocha testing framework and Chai assertion library. These are very compatible with javascript and will enable us to write clear and human-readable texts for our tests.
In server.js, add this single line of code at the end of the page:
export default app;
This line of code will export our server and enable us to import and make use of it in our test environment
Next, create three files in the tests subdirectory: index.js, user.test.js, and user-test-data.js. You can name the last two files whatever you want, but keep in mind what each file does and populate accordingly. The index.js file will be the file that will be checked to execute our tests. This means that we must import our test files(user.test.js) into index.js for them to run successfully. To achieve this, add import "./User/user.test"; to index.js.
The user-testdata.js will contain mock data that our tests will consume. Let's get started with this file. Populate it with the following lines of code:
const user = {
    email: "randommail@gmail.com",
    username: "Yusuf",
    password: "123456"
};

const user2 = {
    email: "randommail@gmail.com",
    username: "Brenda",
    password: "1234556"
};

const user3 = {
    email: "Garry@gmail.com",
    username: "garry",
    password: "123456"
}

const user4 = {
    email: "Temporalmail@gmail.com",
    username: "Yusuf",
    password: "1234556"
};

const profile = {
    firstName: "Ibrahim",
    lastName: "Mohammed",
    phoneNumber:"+234707843456"
};

export {
    user,
    user2,
    user3,
    user4,
    profile
};
In the above, we didn't do much other than defining and exporting some user and profile mock data objects. We would require these objects in the user.test.js file
Populate the user.test.js file as follows:
import chai from "chai";
import chaiHttp from "chai-http";
import server from "../../server";
import {
    user,
    user2,
    user3,
    user4,
    profile
} from "./user-test-data";

chai.should();
chai.use(chaiHttp);
In the above, we imported our packages. We also imported our server which we exported earlier from the server.js file and the user and profile objects from the user-test-data.js file. Next, we initialized our assertion library. There are different methods to choose from. I feel more comfortable with the should method. You can check out both mocha and chai docs for more info about other methods. We also asked chai to make use of chaiHttp to communicate with our server.
Let’s get into writing tests properly. Edit your user.test.js as follows:
describe("Should handle correct user's behaviour", async () => {
before(async () => {
        await dropDB("CI_lesson_test");
      });
    describe("/user/signup should create a user", () => {
        it("it should create a user with complete details successfully", (done) => {
          chai
            .request(server)
            .post("/user/signup")
            .set("Accept", "application/json")
            .send(user)
            .end((err, res) => {
              res.should.have.status(201);
              res.body.should.be.a("object");
              res.body.should.have.property("success").eql(true);
              res.body.should.have.property("message").eql("New User Created Successfully");
              done();
            });
        });
    });
});
For the sake of clarity, let’s call the first describe statement parent-describe. The parent-describe describes all the tests we’ll be writing. In the case of the above, it’s telling us that these tests should handle the correct user’s behavior. Pretty explanatory right?. We included a before hook that will drop our database if it already exists. In part one, we created a function that will drop our database. Hence we passed the dropDB function here. We also passed in the name of the collection we want to drop. in this case, our test database: CI_lesson_test.
This is because we do not want to manually drop the database every time we want to run our test. This will make our lives easy, trust me.
Note that you can either add a before hook or after hook, depending on your preference.
There are other methods like beforeEach and afterEach. You can use these if you want a specific action to occur before or after each test run.
The second describe statement goes more specific, telling us what a specific endpoint should do. Here, the endpoint is “/user/signup” and it should sign up a user. The it statement goes a step further to test how the function will execute if certain criteria are met or not. Here, we defined a done function and made a POST request to our server. We also sent the “user” object we imported earlier as a parameter.
Keep in mind that the assertion method we are using is Should, hence, if the necessary checks are passed, the endpoint should create a user and our response should have a status code of 201. Also, our response body should be an object. In the response body, we should have a property “success” and it should be equal to “true”. Also within our response body, we should have another property “message” which is equal to “New User Created Successfully”. Finally, we call the done() function. To test this out, run the following command in your console:
npm run test. If all goes well, you should have results similar to the following image printed out in your console:
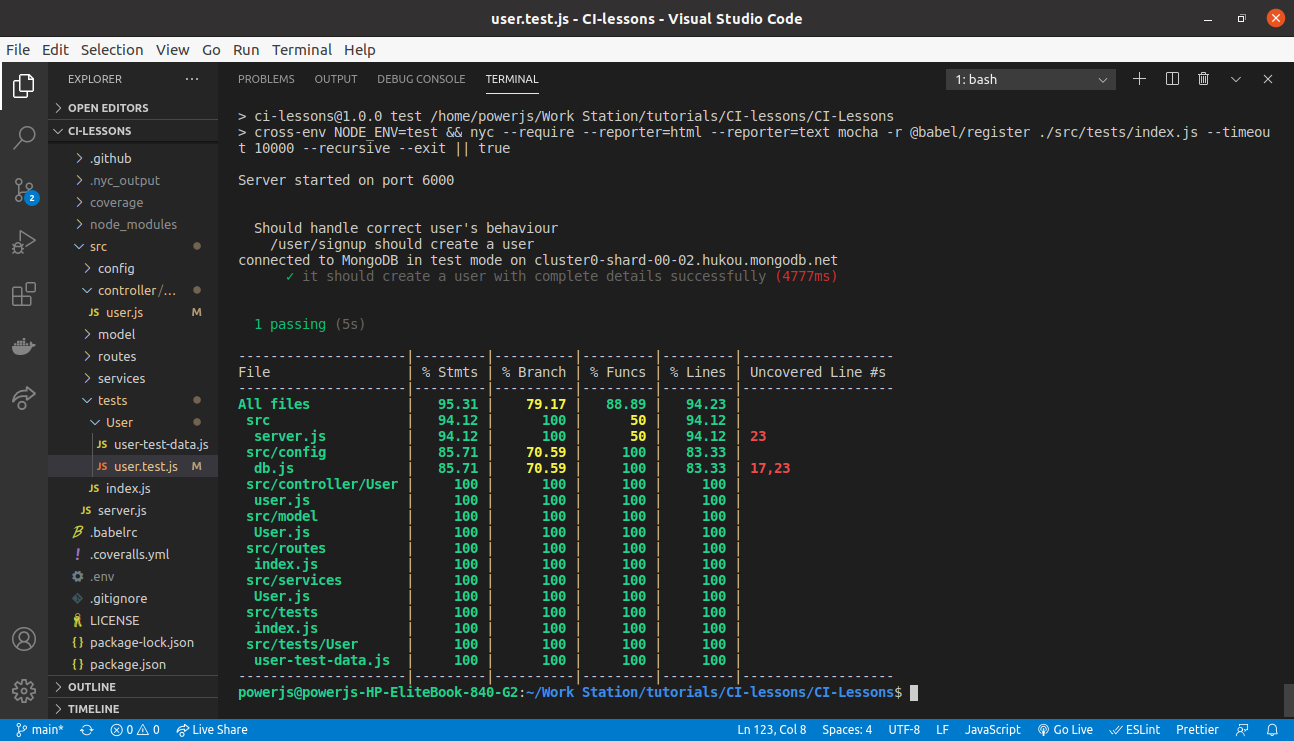
Here, we have one test passing and a report of our test coverage. Let’s add two more tests. We’ll be testing some of the checks we put in place to ensure we don’t create a user with an already existing username or email. The explanation given above is very much applicable. Inside the second describe statement, add the following lines of code just below the “it” statement:
it("it should not create a user with an already taken username", (done) => {
            chai
            .request(server)
            .post("/user/signup")
            .set("Accept", "application/json")
            .send(user4)
            .end((err, res) => {
                res.should.have.status(409);
                done();
              });
        });
        it("it should not create a user with an already registered email", (done) => {
            chai
              .request(server)
              .post("/user/signup")
              .set("Accept", "application/json")
              .send(user2)
              .end((err, res) => {
                res.should.have.status(409);
                done();
              });
        });
    });
The only difference in the above is that we passed user4 and user2 objects as parameters. If you inspect the user-test-data.js file, you’ll notice that the email and username were repeated in user2 and user4 respectively. The createUser function should not create a user in this case and should return a response with a 409 status code. And that’s what we’re testing here. Run the npm run test to see whether your tests will pass or fail. You should have results similar to the image below:
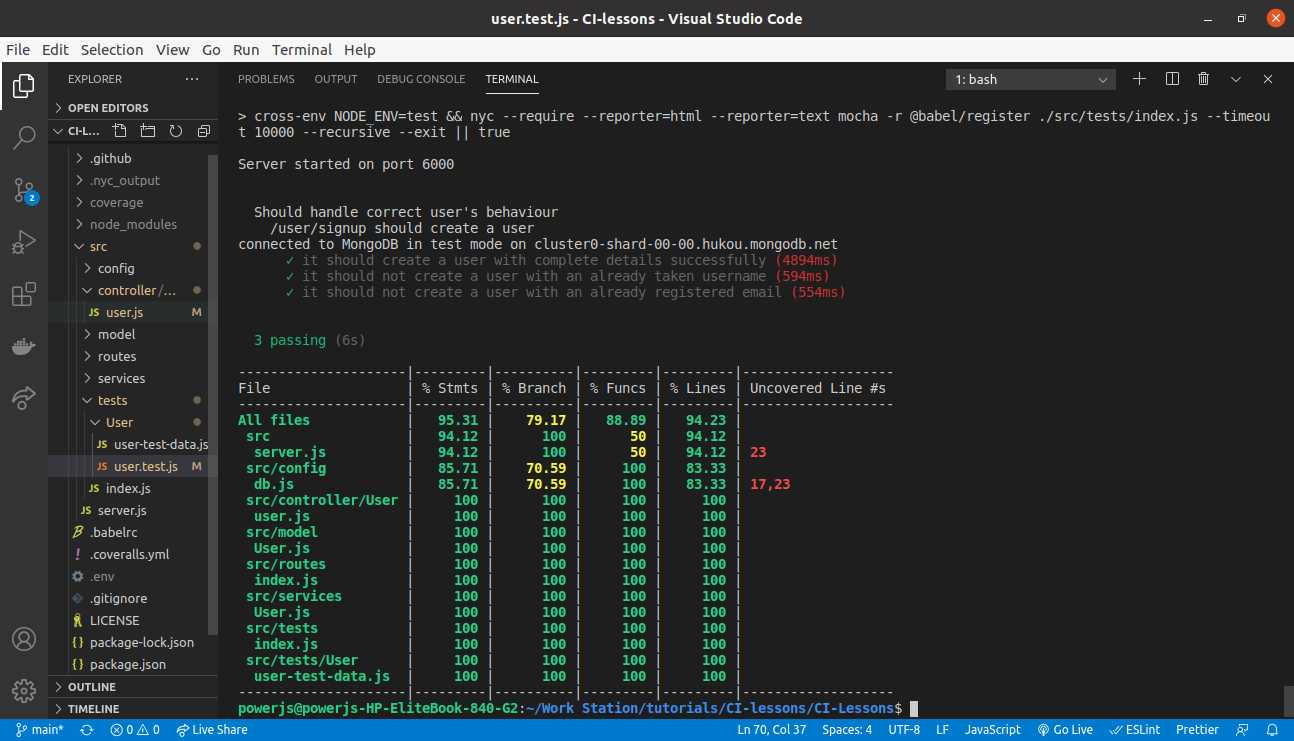
Yay! We have our three tests passing. We’ve been able to create a user, prevent the creation of a user with an already registered email and username. Now, let’s test other endpoints. Let’s try the get all users’ endpoint. We’ll need another describe statement inside the parent-describe statement. So go on, add the following lines of code just below the second describe statement:
describe("/users should get all registered users", () => {
        it("it should get all registered users", (done) => {
            chai
            .request(server)
            .get("/users")
            .end((err, res) => {
                res.should.have.status(200);
                res.body.should.be.a("object");
                res.body.should.have.property("message").eql("All Users Retrieved Successfully");
                done();
            });
        });
    });
In the above, we’re making a GET request to the /users endpoint. This should retrieve all registered users and the response should have a status code of 200. The response body should be an object and have a “message” property with the value “All Users Retrieved Successfully”. Run the test command again to get your result.
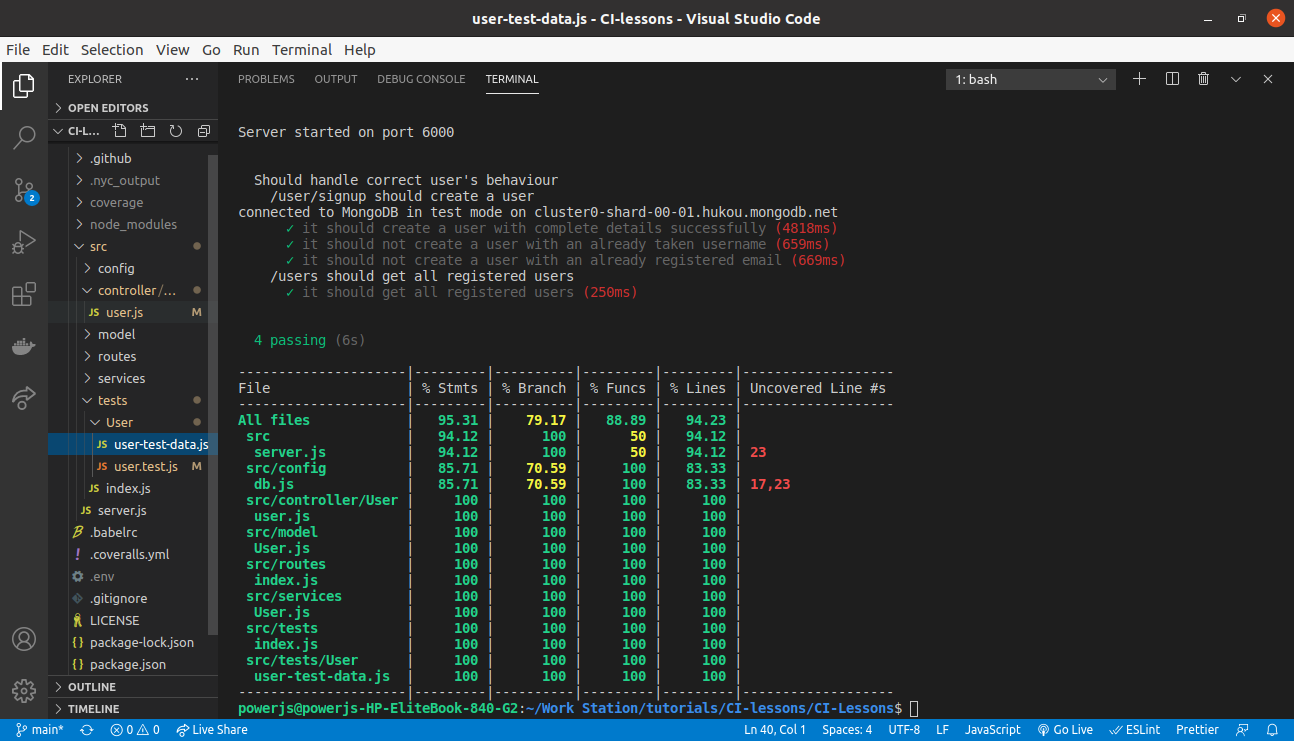
We have four tests passing. Let’s get messier. We’ll test the remaining endpoints at once.
In this case, we want to interact with a single user. We want to get a user, update their profile, and sadly, delete their account. To accomplish this, we’d make use of the before hook. This code will run first and return a value that we’ll use in our test. Less talk. Inside the parent describe statement and below the get all users’ test, paste the following lines of code:
    describe("Handle single user  operations", () => {
        let _id;
        before(done => {
            chai
            .request(server)
            .post("/user/signup")
            .set("Accept", "application/json")
            .send(user3)
            .end((err, res) => {
                if (err) throw err;
                _id = res.body.data._id;
                done();
            });
        });
        it("it should update a user's profile", (done) => {
            chai
              .request(server)
              .patch(`/user/profile/${_id}`)
              .set("Accept", "application/json")
              .send(profile)
              .end((err, res) => {
                res.should.have.status(200);
                res.body.should.have.property("message").eql("User Details Uploaded");
                done();
            });
        });
        it("it should get a single user by ID", (done) => {
            chai
            .request(server)
            .get(`/user/${_id}`)
            .end((err, res) => {
                res.should.have.status(200);
                res.body.should.be.a("object");
                res.body.should.have.property("message").eql("User retrieved!");
                done();
            });
        });
        it("it should delete a user's account", (done) => {
            chai
              .request(server)
              .delete(`/user/delete/${_id}`)
              .set("Accept", "application/json")
              .end((err, res) => {
                res.should.have.status(200);
                res.body.should.have.property("message").eql("User Account deleted");
                done();
            });
        });
    });
There isn’t much going on here. Let’s walk through as usual. Our third describe statement inside the parent-describe statement tests the behavior of a single user. First, defined a variable “_id”. Next, we created a new user in the “before” hook and equate the value of _id to the ID of the user we just created. Next, we use this _id to interact with the user/update/:_id (PATCH request), /user/:_id (GET request), and /user/delete/:_id (DELETE request) endpoints. We should have results similar to the image below:
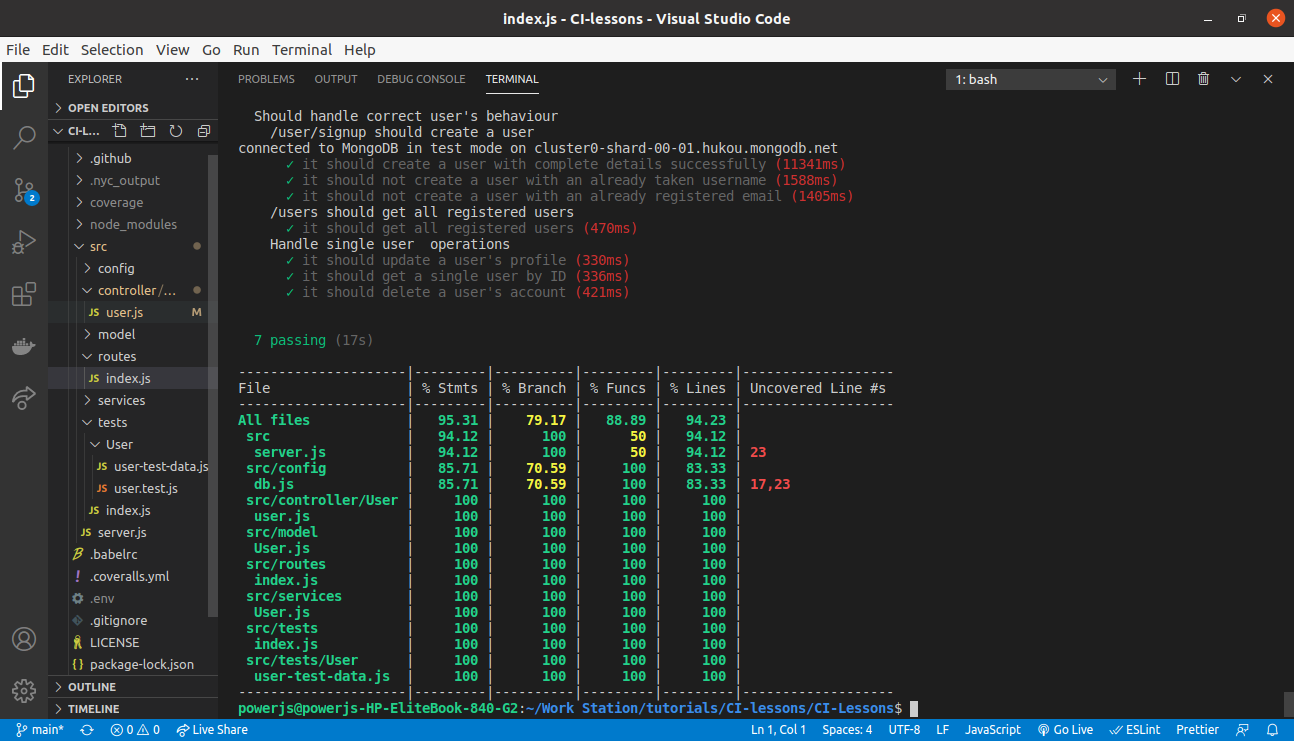
And that’s it. We’re done with our tests.
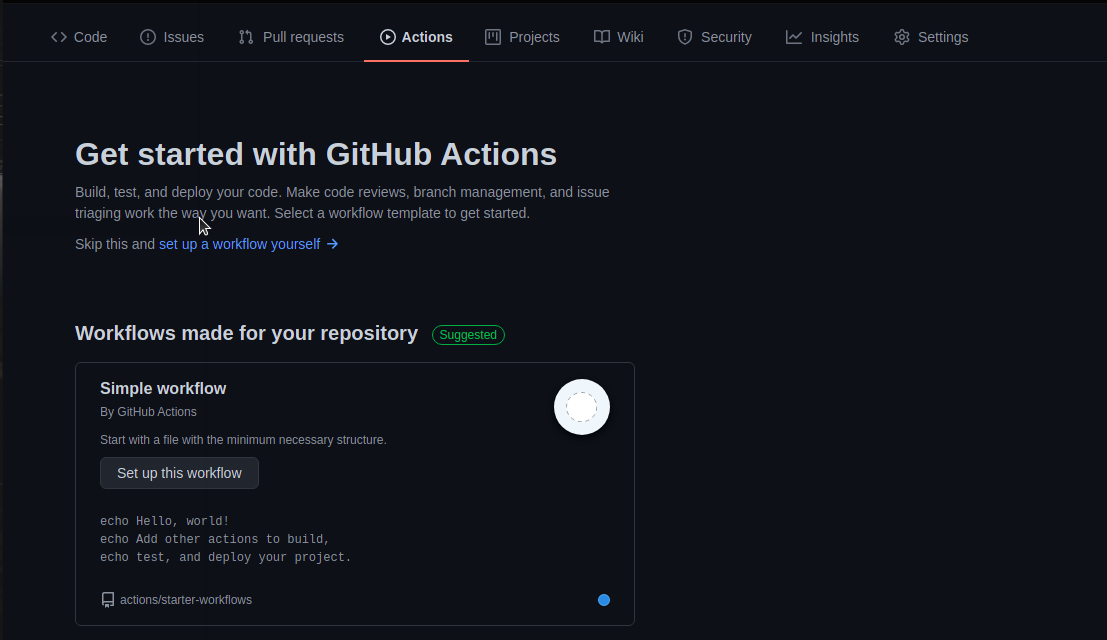
Set up GitHub Actions Workflow
We want to run these tests in an environment other than our local machine. We’ll also report our test coverage with coveralls and add a badge to our GitHub repo. We’ll be making use of GitHub Actions for this purpose. So go to your GitHub repo and click on the Actions tab. There are many options, but we’ll be making use of the first one suggested by GitHub. Click on the “Set up this workflow” button:
We’ll be editing some fields:

You can choose to change the workflow name from blank.yml to something else. I changed mine to nodejs.yml. Next click on the “Start commit” button on the top right corner to commit the file. You can add a commit message similar to the image below:
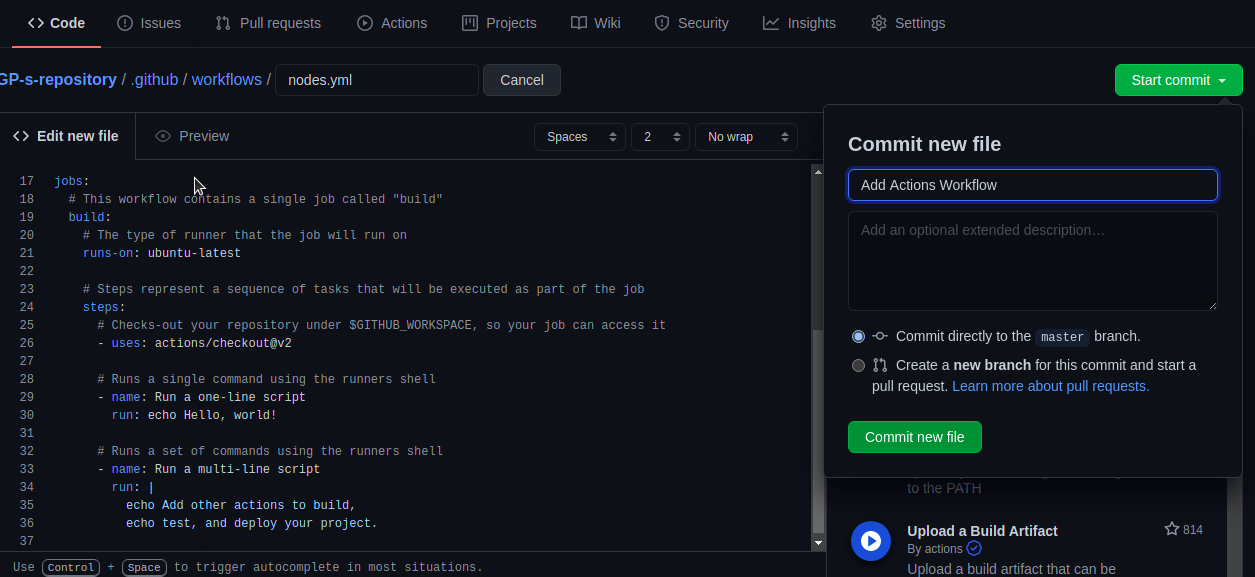
Click on the “Commit new file” button below. This file is saved to the default branch on your repo.
Next, we want to bring this workflow into our local directory. Run
git pull origin main
to pull this file into your local machine. Inspecting your folder structure, you’ll see a .github/workflow directory. Click on it to see the nodejs.yml file you just created on GitHub. We’ll be editing this file to suit our use case. Replace the code in your nodejs.yml file with the following:
name: Node.js CI

on: ["push"]

jobs:
  build:
    name: Build

    runs-on: ubuntu-latest

    strategy:
      matrix:
        node-version: [12.x, 14.x]
        mongodb-version: [4.4]

    steps:
    - uses: actions/checkout@v2
    - name: Use Node.js ${{ matrix.node-version }}
      uses: actions/setup-node@v1
      with:
        node-version: ${{ matrix.node-version }}

    - name: Start MongoDB
      uses: supercharge/mongodb-github-action@1.2.0
      with:
        mongodb-version: ${{ matrix.mongodb-version }}


    - run: npm install
    - run: npm run build --if-present

    - run: npm run coverage
      env:
        CI: true
        NODE_ENV: test
        TEST_MONGO_URI: mongodb://localhost:27017/ActionTtest

    - name: Coveralls
      uses: coverallsapp/github-action@master
      with:
        github-token: ${{ secrets.GITHUB_TOKEN }}
First, we define the name of our workflow. In this case, Node.js CI.
Next, we state when we want this workflow to execute. Now because we want to run our test in a virtual environment(GitHub Actions), we want this workflow to run immediately after we push to our repo on GitHub. Hence, on: [“push”].
Next, we’ll be defining the jobs we want to run. Remember that we’re trying to run our code in a virtual environment, therefore we need to provide all resources it’ll need to run successfully. The first job is to build our program. Here we defined the OS we want our code to run on. Ubuntu-latest is the default, so we leave it that way.
Next, we define our strategy. We want to connect our Nodejs server to a MongoDB database in a virtual environment. We specify the versions of Nodejs and MongoDB we want to run.
Next, we define the steps we’ll want the workflow to take. Since each operation will depend on the other, defining the exact sequence of events becomes very important. After instructing the workflow that we’ll be running a NodeJs application, the next thing is to provision a MongoDB database. This is because we want the database to be readily available when we want to establish a connection. If this step comes later than this, our database may not be available for connection when we want it. To run the “Start MongoDB” job, we need to make use of the MongoDB server. To get more info on this, do check out the GitHub marketplace here.
The next step is to install our dependencies with npm install. To also check that our build script is working as expected, we run a job for it.
Finally, we want to run our test. Because we also want to get our coverage report, we’ll use the coverage script instead of the test script. Inspecting the coverage script in your package.json, you’ll notice that it runs the test script first before getting the coverage report. Since we need to connect to the database for our test to run, we add a test database to the environmental variable. We also define our NODE_ENV and equated CI to true. The next job is to get the coverage report and pass it to coveralls, which would then display the percentage of coverage we were able to achieve with our test.
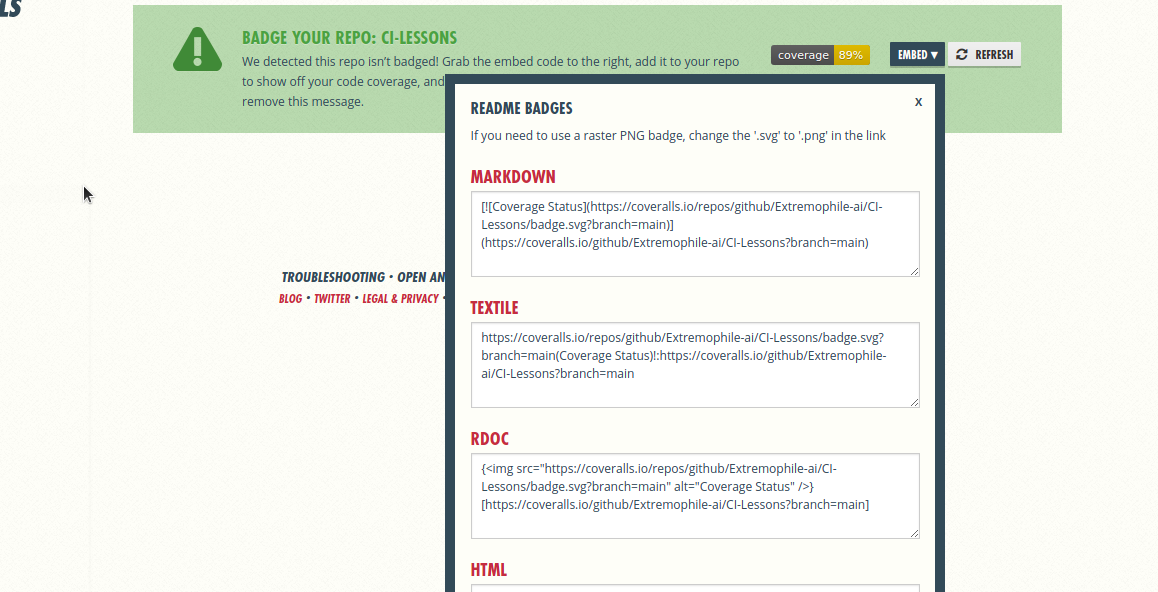
Let’s set up the coveralls file. Navigate to https://coveralls.io to create a coveralls account(if you don’t have one already). Next, link your GitHub repo and follow the prompt to get your repo_token. You’ll need to create a .coveralls.yml file in the root directory of your codebase. Add your repo token to this file. To add a coverage badge to your repo, go back to your linked repo on coveralls and click on the “embed” dropdown at the bottom of the page. Copy the text in the markdown section.
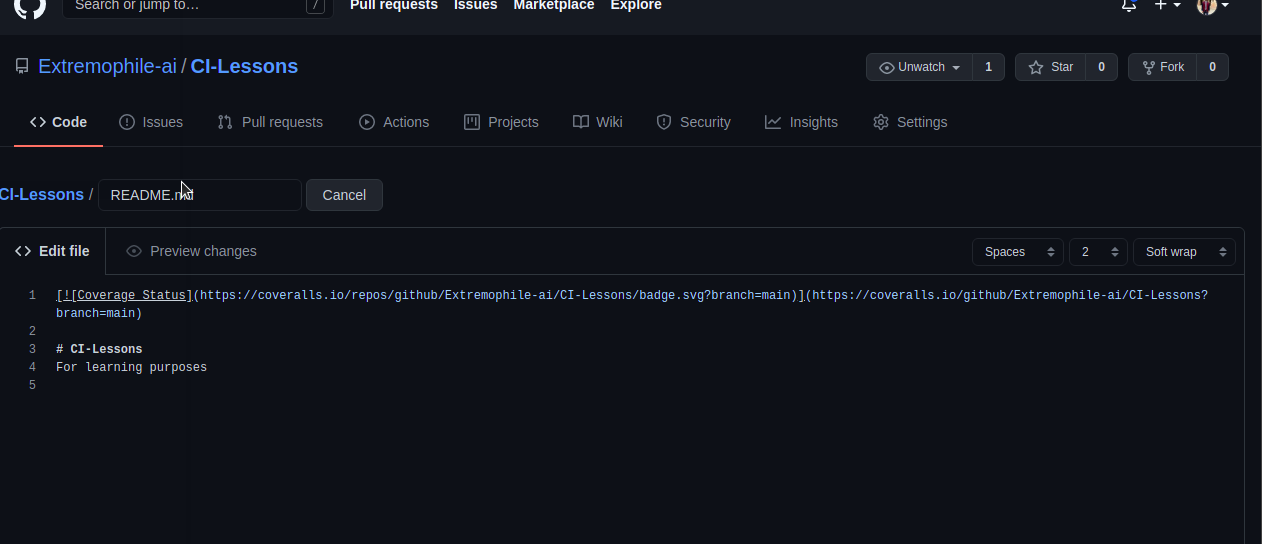
 You’ll paste this on the first line of the README.md file of your repo on GitHub.
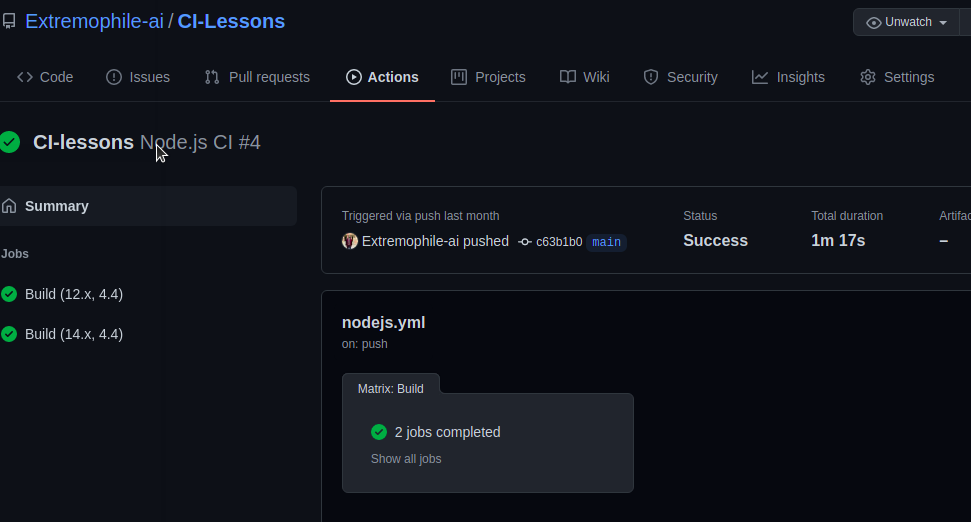
And that’s all. Go back to your text editor. Add, commit, and push your code to GitHub. Go back to GitHub and click on the Actions tab. On successful completion of your workflow, you should have results similar to the image below:
To view that all our tests passed, click on any of the Build. Navigate to the coverage tab and click on it. Your result should be similar to the image below:

Now let’s check the percentage of coverage we got. Navigate to your README.md file. You should see your coverage in percentage similar to the image below:
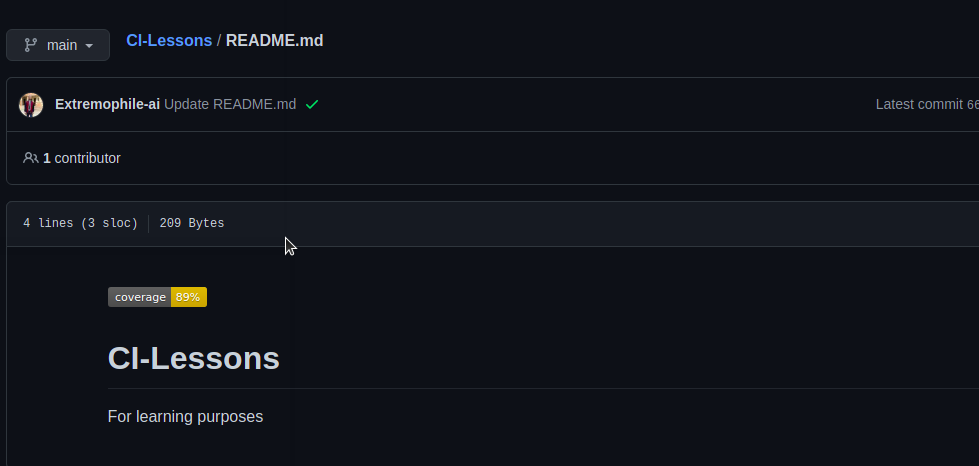
Yay! I got 89% coverage. Sweet.
Deploy to Heroku
To achieve this, create an account with Heroku if you don't have one already.
Log in and create a new app. You can name it whatever you want. I named mine ci-lessions.
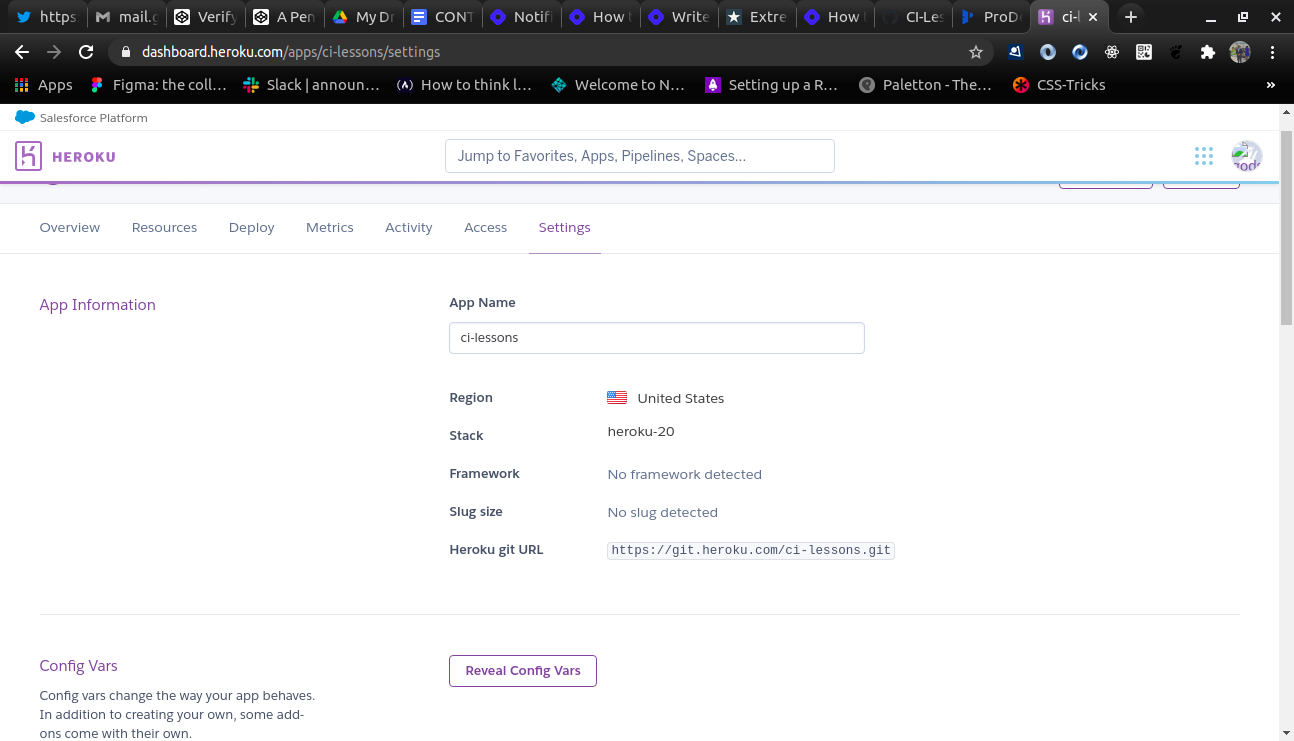
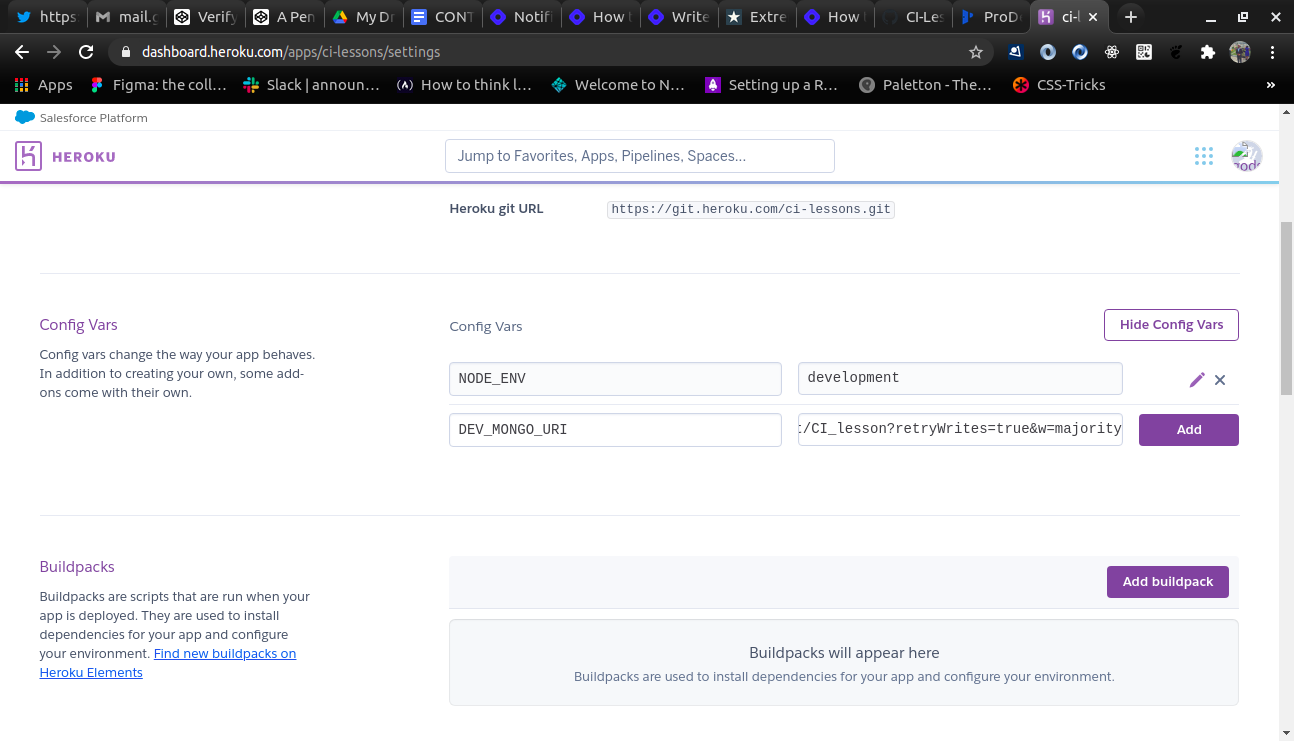
We need to configure this app to suit our use case. Heroku on default strips out devDependencies on deployment. This will pose a slight problem. This is because we need babel to transpile our ES6 syntax to ES5 which most browsers understand. And our Babel packages were installed as devDependencies. We could go around this challenge by reinstalling babel as core dependencies. But I won't use that approach. Instead, I'll tell Heroku to install these devDependencies and treat the app as if we're still in a development environment. To achieve this, I'll set NODE_ENV = development in the config vars. To access the config vars, navigate to the settings tab in your app's dashboard and scroll down. Click on Reveal Config Vars.
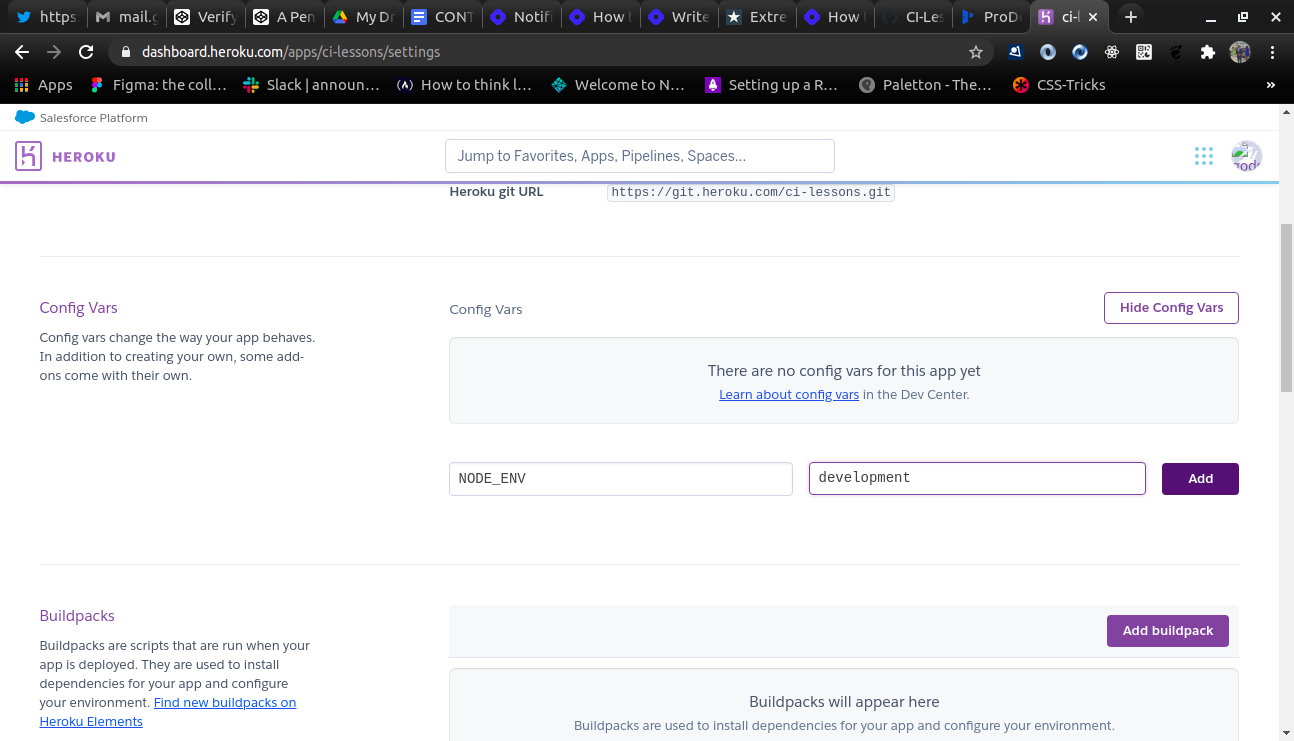
To add environmental variables like NODE_ENV = development to Heroku, NODE_ENV goes to the key input box and development goes to the value input box. You don't need to add the 'equals to (=)' sign. Click on Add.
Next, we need to add our database to Heroku. I'll be using the database from this lesson. You can choose to change it if you want. We will add the database exactly how we added NODE_ENV = development. But we'll add only the DEV_MONGO_URI database.
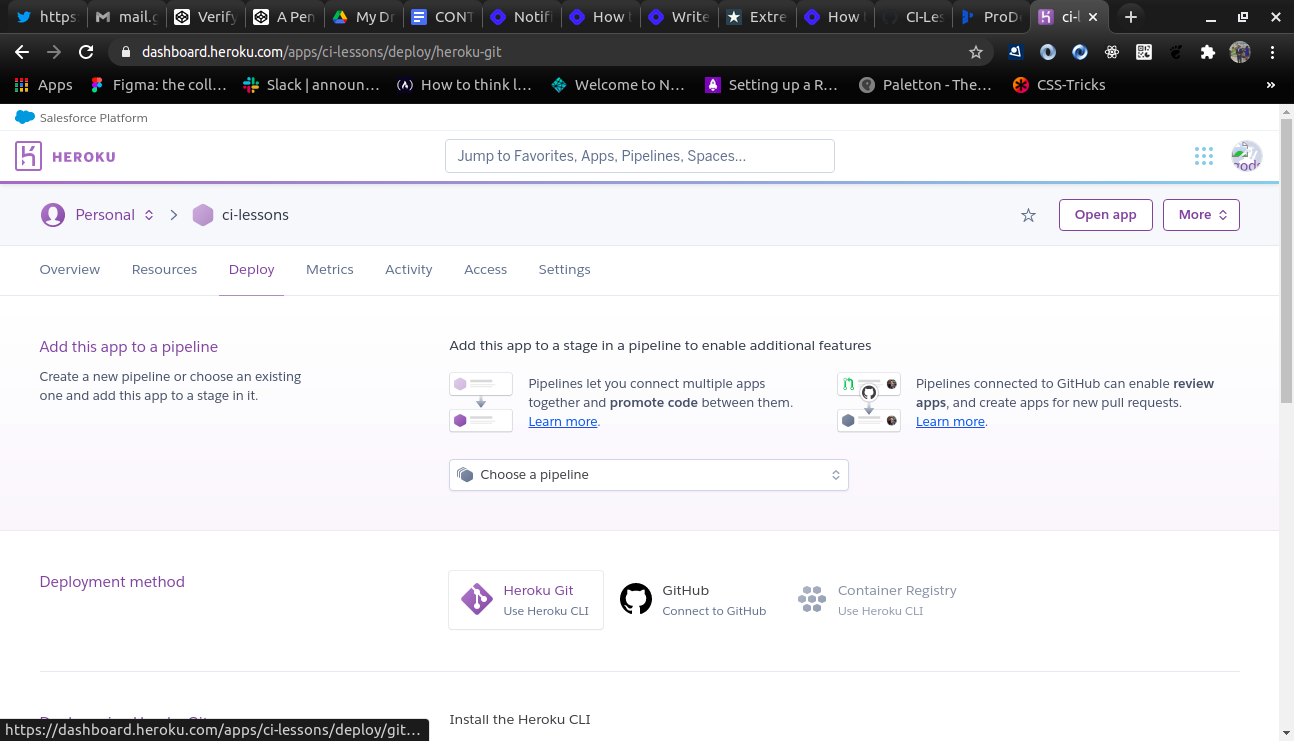
Next, navigate to the deploy tab in your dashboard. We already have our code on GitHub, our next task is to deploy it to Heroku from GitHub and Heroku makes this very easy.
Click on the connect to GitHub tab on this page.
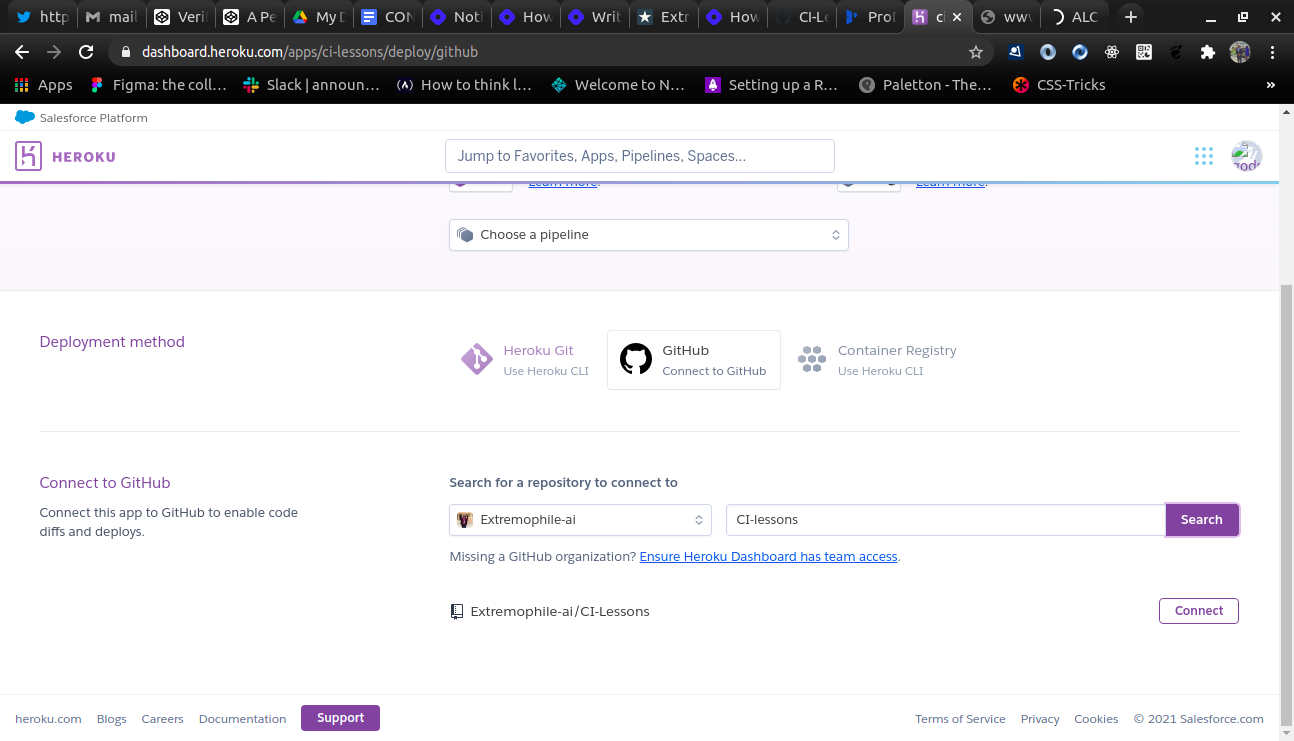
You'll be prompted to connect or add your GitHub repository where your codebase is.
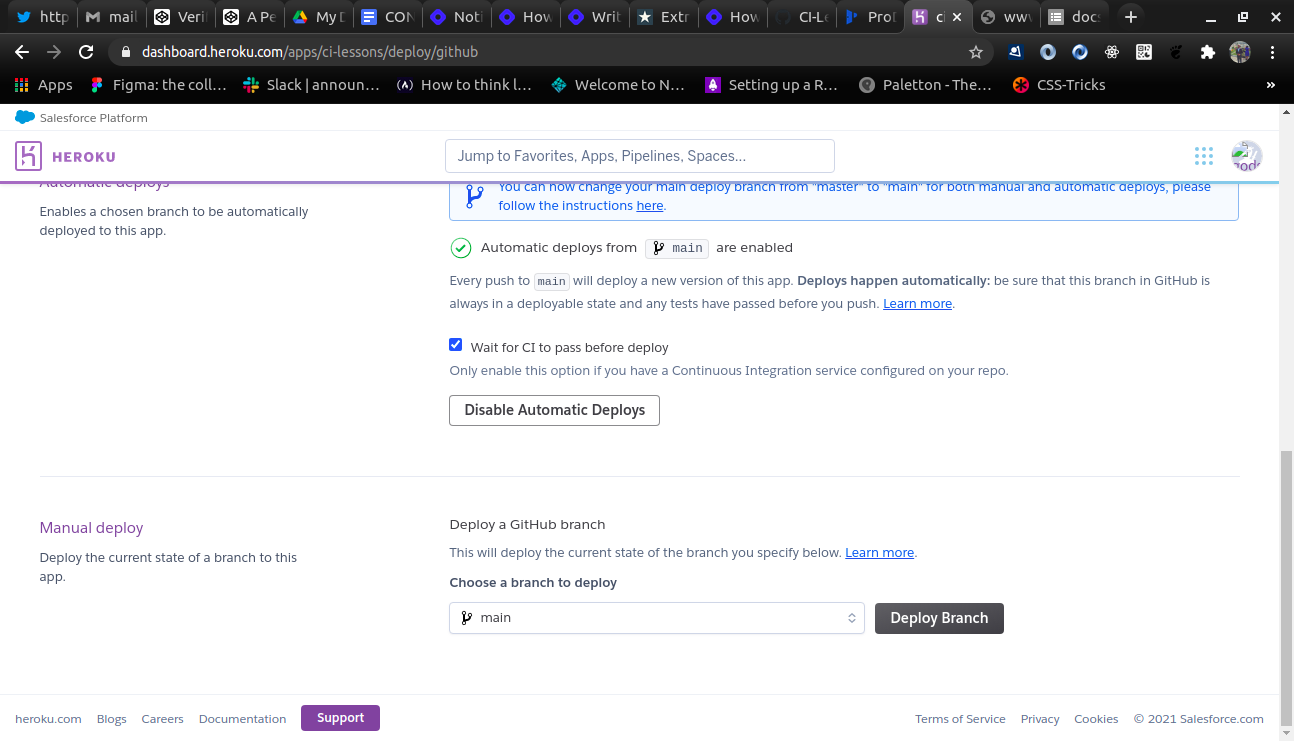
Upon successfully adding your repo, you'll need to choose a branch you want to deploy. Because we have just one branch, we leave this field the way it is. Next, we click on the check box that says Wait for CI to pass before deploy. This is because we want our tests to run first and pass before deploying our app. The importance of this step is to ensure that we don't deploy a faulty app to Heroku. Next, we need to make deployment automatic, hence we enable it.
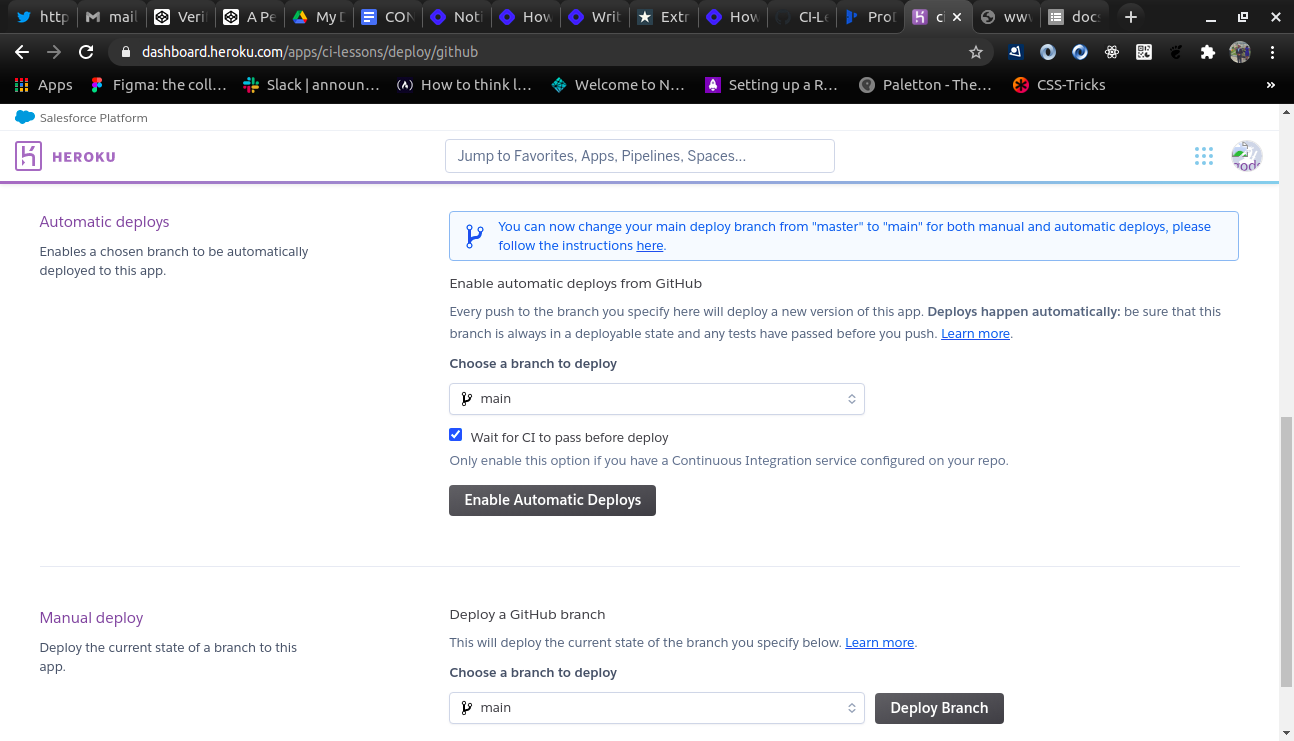
Now because our tests had already passed before we linked the project repo to Heroku, we need to manually deploy the project to Heroku. We achieve by clicking on the Deploy branch button below.
if everything goes well, we should have the following page displayed:
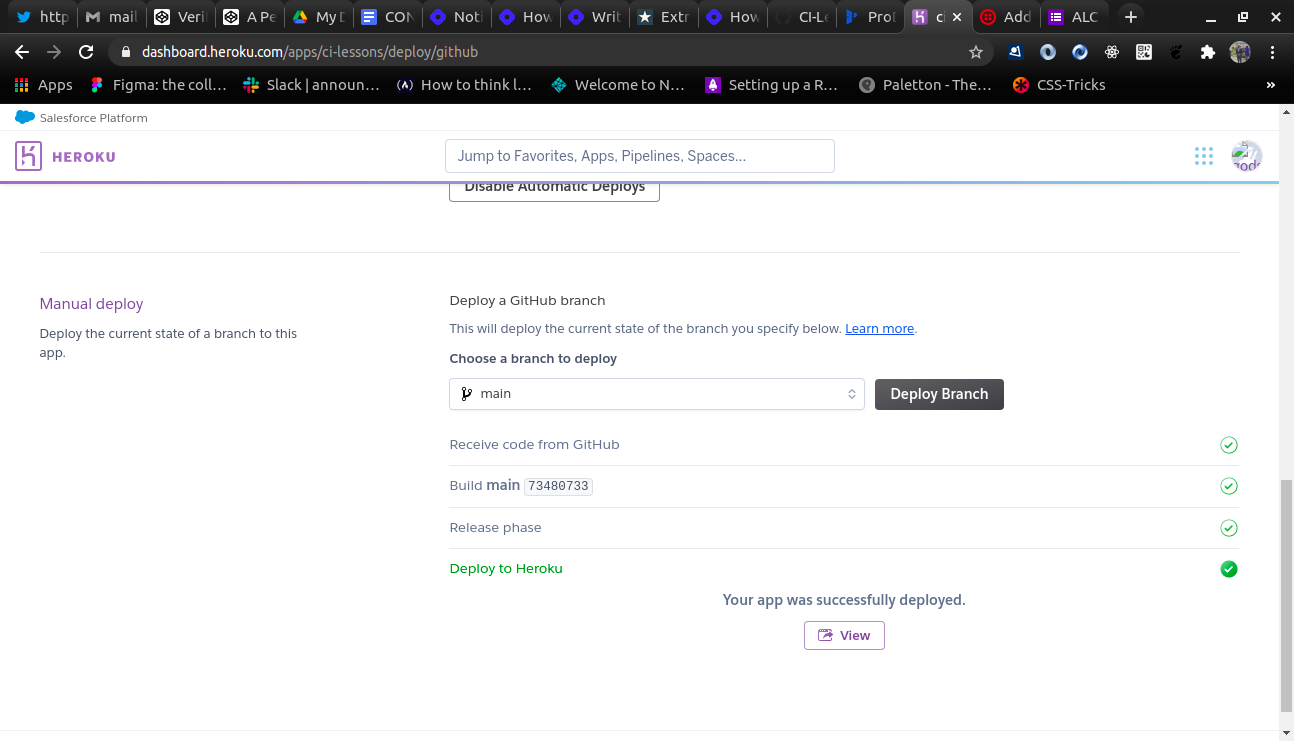
Finally, click on the view button to see your home page.
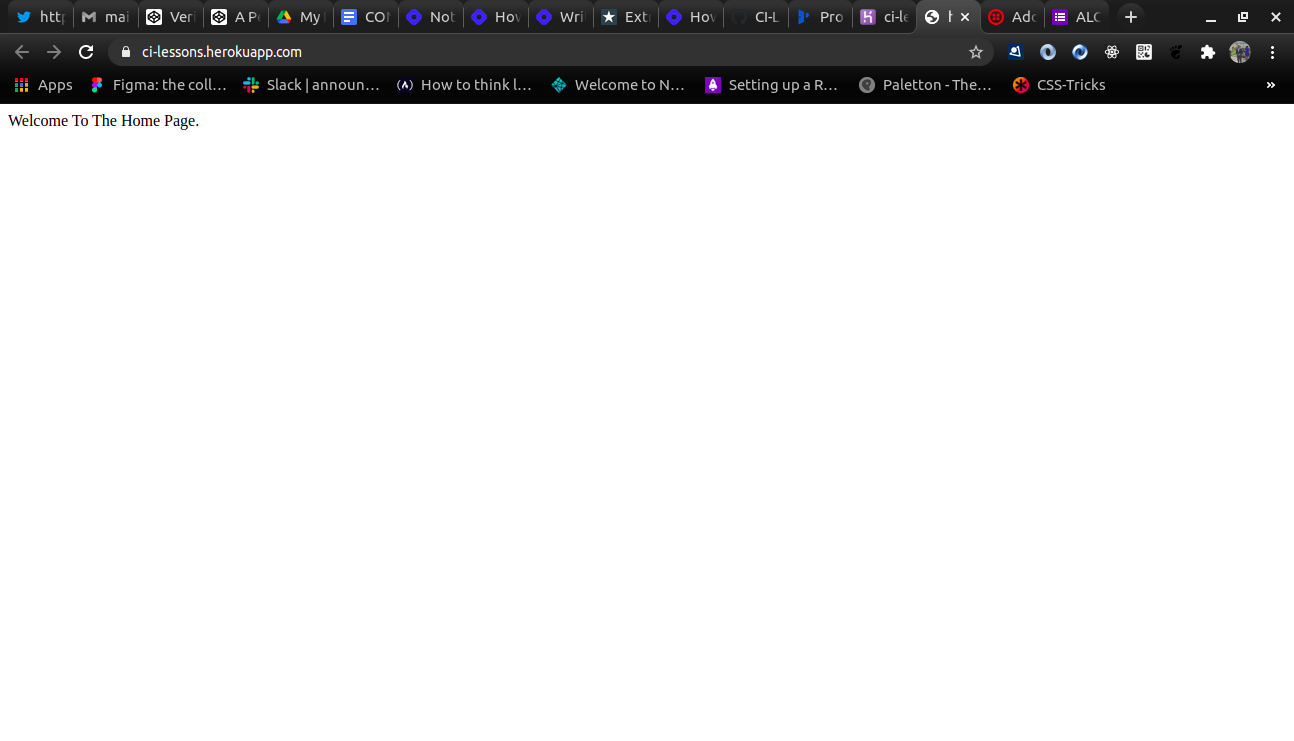
Your base URL is your home page URL. You can now test your various endpoints by replacing localhost:6000 with yourBaseURL.
Conclusion
In this 3-part series, we have learned how to Create, Read, Update and Delete a User account. We also learned how to interract with database like MongoDB, write tests for our code in local environment and run same tests in a virtual environment like GitHub Actions. We also linked our project repo to coveralls so that we can report test coverage. Finally, we deployed our code to Heroku.
I have to put it out here that the approach discussed here is just one of various ways to achieve this ad I do hope you'll find this straight forward and comprehensive.
If you have a question about a concept that isn't clear, please don't hesitate to reach out and I'll be glad to help out.
Thanks.


