


In Part One of this blog series, we successfully set up our development environment, connected a MongoDB database, and started up our server in development mode.
In this part, we have the following goals:
- Create models
- Create methods
- Create controllers
- Create routers and define endpoints
The source code to this tutorial can be found here
Create User Model
In Part One, we defined our folder structure. Here, we created a subdirectory called model and created a user.js file in it. We will define our user model in this file.
import mongoose from "mongoose";

const UserSchema = new mongoose.Schema({
    username: {
        type: String,
        unique: true,
        lowercase: true,
        required: true
    },
    email: {
        type: String,
        lowercase: true,
        required: true
    },
    password: {
        type: String,
        required: true
    },
    firstName: {
        type: String,
        lowercase: true,
    },
    lastName: {
        type: String,
        lowercase: true,
    },
    phoneNumber: {
        type: Number,
        lowercase: true,
    },
    address: {
        type: String,
        lowercase: true,
    },
    createdAt: {
        type: Date,
        default: Date.now
      },
    updatedAt: {
        type: Date,
        default: Date.now
    }
 });

 export default mongoose.model("User", UserSchema);
In the above, we imported the ODM mongoose which we installed in the previous part. Mongoose will help us communicate with our MongoDB database easily.
Next, we defined our userSchema. This is like the skeleton or backbone of a user. A user must have a username, email, password, and the rest of the fields seen in the schema above. Some of the fields were defined with a required attribute set to true. This means that at the point of creating a user, those required fields must be supplied. We also set a lowercase attribute to true. This will ensure that all data sent to the database are in lowercase. and enforce uniformity. Notice that we didn't add the lowercase attribute to the password field. This is because we do not want to temper with the user's password. The passwords will be saved exactly as they are entered. Well, not exactly in plain text. More on this later.
Finally, we exported our userSchema and User Model so that we can access them in other files.
Create Methods
To make our code readable and reuseable, we will create some methods that will perform specific actions. These methods can be used in multiple places and it isn't advisable to repeat blocks of code.
In the services sub-directory, create a user.js file. This file will contain all the methods we will create in relation to our user model. Populate the src/services/user.js file with the following:
import User from "../model/User";

export default class UserServices {
    static async createUser (userDetails) {
        try {
            return await User.create(userDetails);
        } catch (error) {
          return error;
        };
    };

    static async findUser (email) {
        try {
            return await User.findOne({ email });
        } catch (error) {
          return error;
        };
    };

    static async findById(_id) {
        try {
            return await User.findOne({ _id })
        } catch (error) {
            return error;
        }
    }

    static async getUsers () {
        try {
            return await User.find();
        } catch (error) {
          return error;
        };
    };

    static async checkUsername (username) {
        try {
            return await User.findOne({ username });
        } catch (error) {
          return error;
        };
    };

    static async updateUser(_id, updateDetails) {
        try {
            return await User.findByIdAndUpdate( _id, updateDetails, { new: true  });
        } catch (error) {
            return error;
        }
    };

    static async deleteUser(_id) {
        try {
            return await User.findByIdAndDelete({ _id });
        } catch (error) {
          return error;
        }
    };
};
Let's quickly explain what each of these methods does.
First, we imported the User model we just created in the model subdirectory. We’d be calling our methods against this model. Next, we defined and exported a class UserServices which will contain all our methods. The first method is the createUser which takes in the user details we want to create. This method calls on the create method provided by mongoose. This create method creates a user using our predefined model and saves the user to the database.
The next method, findUser, takes in a user’s email and runs a search query on the database to retrieve any user who has the provided email attached to their details. Remember we set a unique attribute to true in the user model. This will ensure that two or more users cannot have the same email address. This method makes use of the findOne method provided by mongoose.
We created methods checkUsername, findById which also made use of the findOne method from mongoose. The only difference is that checkUsername will accept username as its parameter while findById will accept the user's ID. They both do the same thing, i.e, querying the database to retrieve specific users who have attributes being searched for. The findOne method can only return one document that matches the search query.
Next, we create a getUsers method which calls the find method from mongoose. This getUsers method runs a query against the database and returns all registered users.
Next is the updateUser method calling on mongoose’s findByIdAndUpdate method. The updateUser method takes in the user’s ID and update details. The ID is used to retrieve the user whose details or profile you want to update.
The final method is the deleteUser method which takes in only the user’s ID and calls on the findByIdAndDelete method from mongoose. The deleteUser runs a query against the database, retrieves the user, and delete their records from the database.
We'll be making use of these methods in the next section.
Create Controllers
In the controller subdirectory, create a User.js file and populate it with the following:
import bcrypt from "bcrypt";
import User from "../../services/User.js";


const {
    updateUser,
    findById,
    checkUsername,
    getUsers,
    findUser,
    deleteUser,
    createUser
} = User;
First, we imported the bcrypt package we installed earlier. We’ll use this package to hash user’s passwords so they don’t get stored in the database as plain text. Next, we import our methods. Remember we just created them in the services subdirectory. Next, we destructured these methods so we can make our code a bit clean and readable.
We will start creating our controller in the next step. Paste the following code snippet just below the destructured methods:
export default class UserController {
    static async createNewUser (req, res) {
        try {
            const { username, email, password } =req.body;
            if(!username || !email || !password) {
                return res.status(400).json({success: false, error: "One or more parameters are missing"})
            }
            const checkEmail = await findUser(email);
            const usernameExist = await checkUsername(username);
            if(usernameExist || checkEmail) {
                return res.status(409).json({ status: 409,
                error: "Sorry, email or username already taken by another user."
                });
            };
            const hash = await bcrypt.hash(password, 10);
            const userDetails = { username, email, password: hash };
            const newUser = await createUser(userDetails);
            if(newUser) {
                return res.status(201).json({
                    success: true,
                    message: "New User Created Successfully",
                    data: newUser
                });
            };
        } catch (error) {
            return res.status(500).json({
                success: false,
                error: "Server Error"
            });
        }
    };

//...
}
In the above, we defined and exported the UserController class. This class will contain all of our functions. Our first function will create a user. In creating a new user, we’ll be accepting three parameters: username, email, and password. These will come from the input boxes at the point of registration. Also, remember that we set these parameters to have a required attribute in our model. So if any of the three parameters isn’t supplied, our code won’t run. An error message will be shown, telling us that one or more parameters are missing.
Next, we run a check against the database to know if a user with a supplied email or username already exists. This is because we set the unique status on the username and email attributes to true. So if another user wants to register with either an already registered username or email, it won’t work. To achieve this, we make use of the checkUsername and findUser methods we created in services. If the username or email already exists, we return an error message, telling them that the username or email is already taken.
If the username and email address do not exist already, we proceed to hash the password using Bcrypt’s hash method. This takes in two arguments: our plain text password and the number of level of encryption we’d want to use on our password. In this case, we used 10. Next, we defined a constant userDetails which would be an object containing details of our new user. Notice that we passed in the hash as a value to the password key. Next, we called the createUser method and passed in the userDetails as an argument. This goes on to create a new user and returns a success message if the whole process is successful. If there’s an error like a network error or the database isn’t connected, an error with status code 500 is returned, informing us about the type of error preventing the user from being created.
Next, let’s get a single user. Inside the UserController class, paste the following code:
static async getOneUserById (req, res) {
        try {
            const { _id } = req.params;
            const getUser = await findById(_id);
        if(getUser) {
            return res.status(200).json({
                success: true,
                message: "User retrieved!",
                data: getUser
            })
        }
        return res.status(404).json({
            success: false,
            error: "User not found!"
        });
        } catch (error) {
            return res.status(500).json({
                success: false,
                error: "Server Error"
            })
        }
    };
//...
Here, we defined a function getOneUserById which would take in the user’s ID from the web URL. This ID is passed through to the findById method and returns the specific user whose ID matches the search query. If there’s no match, an error is returned with a User not found! message. If there’s a server error, we’d get the status 500 error message.
Next, let’s get all registered users. Paste the following lines of code in the UserController class:
static async getAllUsers (req, res) {
        try {
            const users = await getUsers();
            if(users) {
                return res.status(200).json({
                    success: true,
                    message: "All Users Retrieved Successfully",
                    count: users.length,
                    data: users
                });
            };
        } catch (error) {
            return res.status(500).json({
                success: false,
                error: "Server Error"
            });
        };
    };
//...
The getAllUsers function accepts no arguments. It calls on the getUsers method and returns all available users and the number of users in the database. If there's an error, it is taken care of in the catch block.
Next, we’ll update a user’s details or profile. Paste the following code in the UserController class:
static async updateUser (req, res) {
        try {
            const { _id } = req.params;
            const { address, phoneNumber, lastName, firstName } = req.body;
            const updateDetails = { address, phoneNumber, lastName, firstName }
            const updateUserDetails = await updateUser(_id, updateDetails);
            if(updateUserDetails) {
                return res.status(200).json({
                    success: true,
                    message: "User Details Updated",
                    data: updateUserDetails
                });
            }
            return res.status(404).json({
                success: false,
                error: "User Not Found!"
            })
        } catch (error) {
            return res.status(500).json({
                success: false,
                error: "Server Error"
            });
        };
    };
//...
The updateUser function takes in the user’s ID from the web URL. it also accepts some details from the request body. These include the first and last name, phone number, and address. As explained on the updateUser method in services, the ID is used to get the specific user whose details need to be updated. So the updateUser function calls on the updateUser method which takes in the ID and updateDetails as arguments. When the function gets called and runs successfully, the user’s details get updated and a success message is printed out. If there’s an error like if the supplied ID didn’t match any in the database, a 404 error message is returned, informing that such a user doesn’t exist. If there’s a network error, a 500 error message is returned.
Let’s delete a user. As usual, paste the following lines of code in the UserController class:
static async deleteUser (req, res) {
        try {
            const { _id } = req.params;
            const removeUser = await deleteUser(_id);
            if(removeUser) {
                return res.status(200).json({
                    success: true,
                    message: "User Account deleted"
                });
            };
            return res.status(404).json({
                success: false,
                error: "User Not Found!"
            });
        } catch (error) {
            return res.status(500).json({
                success: false,
                error: "Server Error"
            });
        };
    };
//...
The deleteUser function takes in the user’s ID from the web URL and passes it to the deleteUser method. The deleteUser method runs a search query with the ID against the database and deletes the user whose ID matches the search query. If there’s no match, a 404 status code and a “User Not Found!” error message will be returned. Or if there’s a network error, a 500 status code, and a “Server Error ” error message will be returned.
Alright, we are done setting up our controller.
Create router and define endpoints
In this section, we'll define our routes and HTTP request methods. This will be in our routes subdirectory. Create an index.js file in the routes subdirectory and paste the following code in it:
import { Router } from "express";
import UserController from "../controller/User/user";

const router = Router();

const { createNewUser, getOneUserById, updateUser, getAllUsers, deleteUser } = UserController;

router.get("/user/:_id", getOneUserById);
router.get("/users", getAllUsers);
router.post("/user/signup", createNewUser);
router.patch("/user/profile/:_id", updateUser);
router.delete("/user/delete/:_id", deleteUser);

export default router;
In the above, we imported and initialized Router from the express package installed earlier. Next, we imported our UserController. We destructured for readability. Using the router we initialized, we define 4 HTTP request methods: GET, POST, PATCH, and DELETE. These methods will take in the appropriate functions and execute them as required. We exported the router so we can call it in server.js.
Let’s update server.js as follows:
import express from "express";
import dotenv from "dotenv";
import cors from "cors";
import { connectDB } from "./config/db";
import router from "./routes/index";

const app = express();

dotenv.config();

app.use(cors());
app.use(express.json());

// connect to MongoDB database
connectDB();

//routes
app.use("/", router);

// Home page
app.get("/", (req, res) => {
    res.send("Welcome To The Home Page.");
  });

const PORT = process.env.PORT || 6000;

app.listen(PORT, () => {
    console.log(`Server started on port ${PORT}`)
});
In the above, we imported the router and called it in server.js.
It’s time to test what we’ve been building and correct errors if any. Start your server by running the following command:
npm run dev
This will start your server in development mode. Open your postman and test all your endpoints.
To create a user, add localhost:6000/user/signup to the URL bar. Change the HTTP request method to POST and add your user details as depicted in the image below. If you followed everything accordingly, you should have a success message printed out as shown below. Checking your database, you’ll see the user you just created.

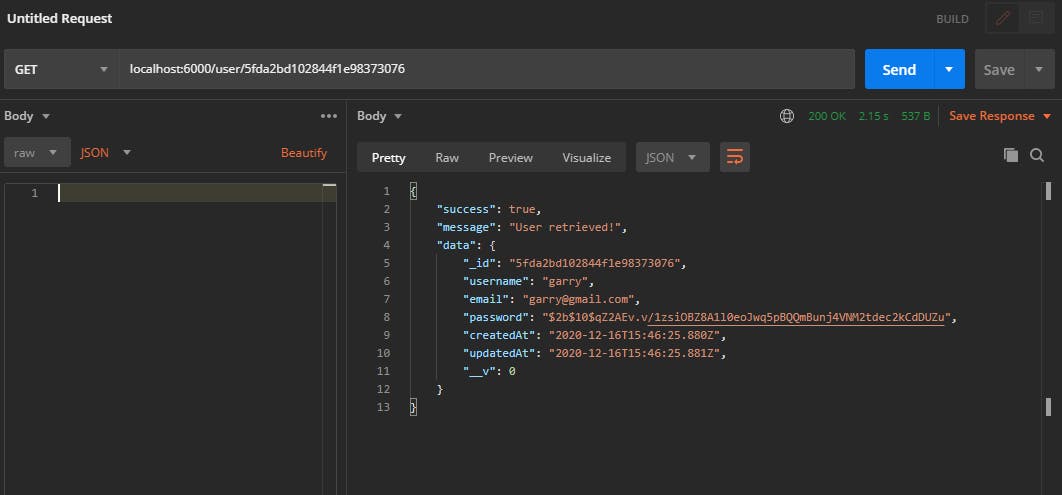
Let’s retrieve a single user. Change the URL to localhost:6000/user/:_id. Note that you have to pass in the user’s actual ID in the URL. This ID is in your postman as "_id":"5fda2b*". Also, change the HTTP method to GET. You should have something similar to the image below after clicking on send.
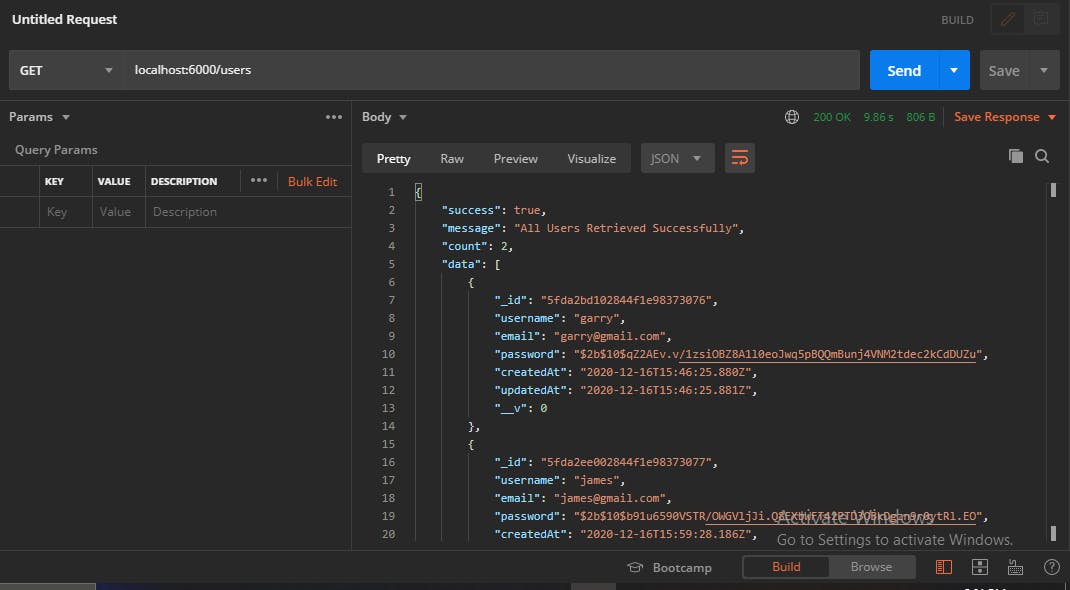
Next, let’s get all available users. Our URL will be localhost:6000/users. We don’t need to pass in any other parameter. The method is still a GET request. Your results should be similar to the image below: Note that I created a second user so I can retrieve all of them.
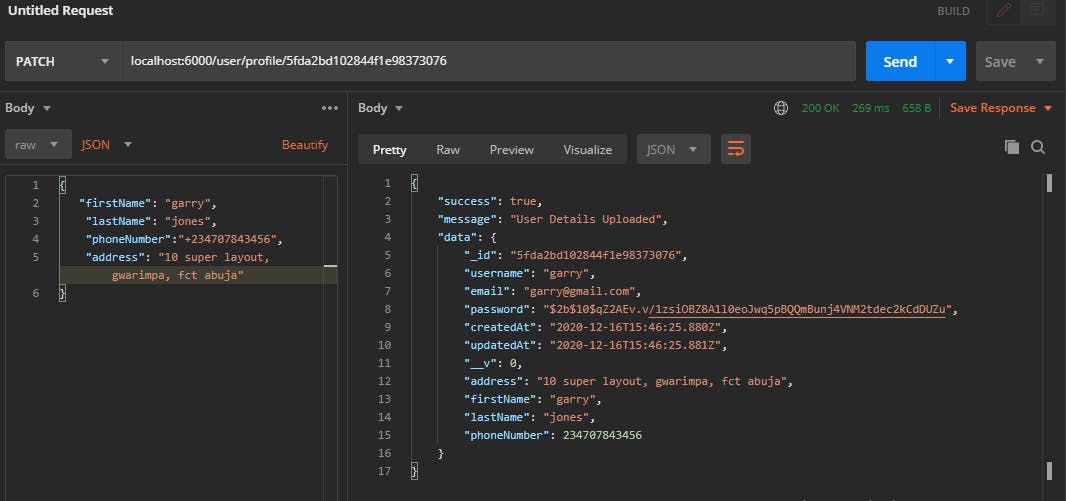
Next, let’s update the details of a single user. Remember we’d need the user’s ID and update details. Our target URL is localhost:6000/user/profile/:_id. Remember to update the ID to the specific ID of the user whose details you want to update. The method for this operation is PATCH, so update accordingly. You should have something similar to the image below if your update was successful:
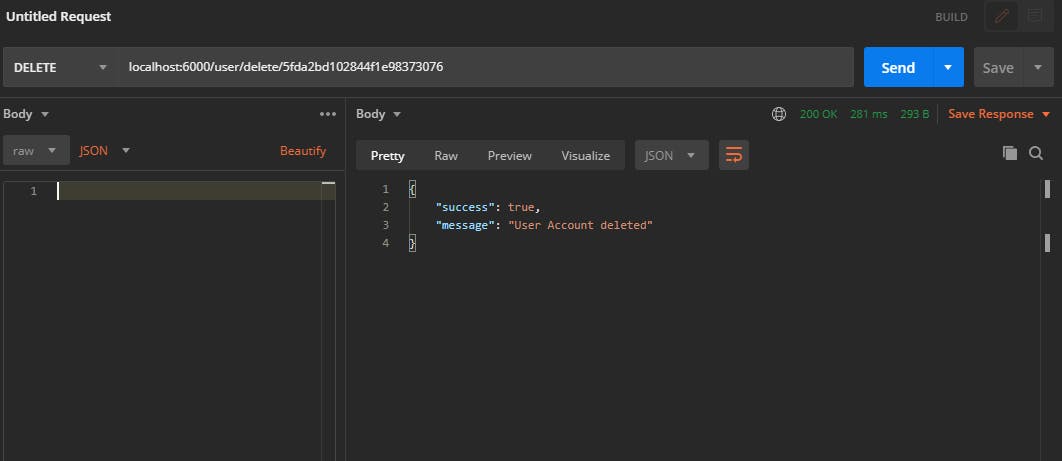
Next, let’s delete a user. We’ll need the user’s ID to accomplish this. Our target URL is localhost:6000/user/delete/:_id and the method for this operation is DELETE. Upon successful execution of this operation, you should have results similar to the image below:
Congratulations! You have successfully created a CRUD API.
In the next part, we will write tests for all the endpoints we defined. We'll configure GitHub Actions to automate our tests in a virtual environment. We'll also add a coveralls badge to our repo to report test coverage. Finally, we'll host our API on Heroku.
Stay tuned!